

Mastering Plastic Worm Colors for Bass: An Expert Guide
Ever spent a day on the water, knowing the bass are there, but failing to get a single bite on your plastic worm? It’s a frustrating experience every angler faces, often leaving them questioning their technique, location, or lure choice. However, the solution might be simpler and more colorful than you think. Understanding the nuances of plastic worm colors for bass is one of the most critical skills that separates novice anglers from seasoned pros. This guide will solve the color selection puzzle for you, transforming your tackle box from a random assortment into a strategic arsenal.
We’ll dive deep into the science and strategy behind why bass prefer certain hues over others based on water clarity, light conditions, and available forage. This comprehensive plastic worm color guide will provide actionable worm color tips, demystify the selection process, and give you the confidence to tie on the perfect color for any situation. Prepare to learn not just *what* colors to use, but the crucial *why* behind each choice, ensuring you spend less time guessing and more time setting the hook.
Table of Contents
- Understanding Plastic Worm Colors for Bass
- Why Worm Color Selection is a Game-Changer
- The Ultimate Guide to Choosing the Right Color
- Best Practices & Expert Worm Color Tips
- Common Worm Color Mistakes to Avoid
- Advanced Color Strategies for Trophy Bass
- Essential Tools & Resources for Color Matching
- Frequently Asked Questions
Understanding Plastic Worm Colors for Bass
The concept of plastic worm colors for bass goes far beyond simple aesthetics; it’s a strategic decision rooted in fish biology and environmental science. It involves selecting hues that either perfectly mimic natural prey or create a provocative, reaction-inducing contrast that bass can’t resist. Making the right choice is fundamental to success with this versatile lure.
A successful plastic worm color selection considers how colors appear to bass underwater, which is heavily influenced by water clarity and light penetration. This plastic worm color guide breaks down the choices into logical categories, from natural plastic worm colors designed for imitation to bright plastic worm colors meant for visibility. Mastering clear water worm colors, murky water worm colors, and even seasonal worm colors through effective worm color matching is what elevates an angler’s game. These worm color tips are not just suggestions; they are proven principles.
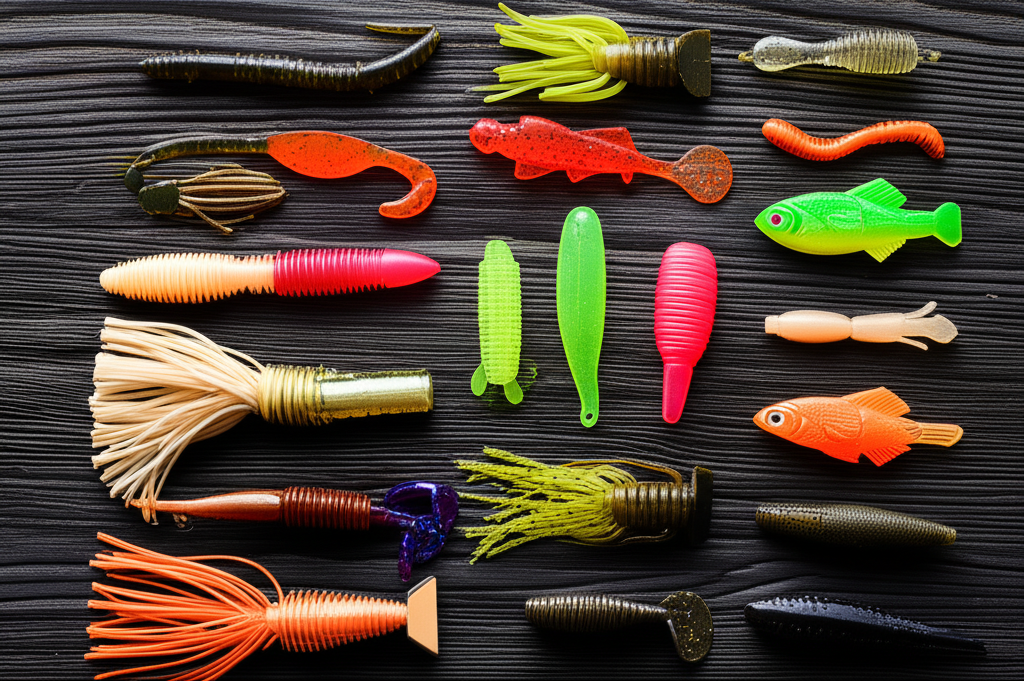
Key Color Categories
- Natural/Translucent Colors: These shades, like Green Pumpkin, Watermelon, and Smoke, are designed to imitate common bass forage such as crawfish, bluegill, and shad. They excel in clear to slightly stained water where bass rely heavily on sight.
- Dark/Solid Colors: Hues like Black, Junebug, and Black/Blue Flake provide a strong silhouette. They are killer choices for murky water worm colors or in low-light conditions (dawn, dusk, and heavy overcast) where contrast is more important than detail.
- Bright/Reaction Colors: Chartreuse, Bubblegum, and Meringue are attention-grabbing colors. These bright plastic worm colors are used to trigger a reaction strike, especially in dirty water or when targeting aggressive, feeding fish during specific seasonal worm colors periods like the pre-spawn.
- Laminated & Two-Tone Colors: These worms combine two or more colors, often with a darker back and a lighter belly. This provides a highly realistic imitation of baitfish and offers versatility across different light conditions.
Why Plastic Worm Colors for Bass Matters: Key Benefits
Some anglers argue that “any color works as long as it’s green pumpkin,” but data and experience prove otherwise. Proper color selection can increase your catch rate by over 50% in certain conditions. It’s about presenting the most convincing or enticing offering to a predator that has evolved over millennia to hunt effectively in its environment.
Adapting to Changing Conditions
Water clarity can change in a matter of hours due to rain, wind, or boat traffic. An angler who understands how to switch from natural plastic worm colors in clear water to dark or bright hues in newly muddied water has a significant advantage. For example, after a heavy rain turns a clear lake into chocolate milk, switching from a subtle Watermelon Seed worm to a bold Black/Blue flake worm can be the only way to get bit, as the latter provides a much stronger silhouette for bass to target.
Matching the Hatch for Pressured Fish
In heavily fished waters, bass become conditioned to common lure presentations. The ability to perform precise worm color matching to local forage—be it a specific shade of crawfish in the spring or the silvery flash of alewives in the summer—can fool even the wariest fish. If bass are feeding on bluegill with distinctive orange bellies, a green pumpkin worm with an orange flake or a tip dipped in orange dye can outperform a standard color tenfold. This attention to detail demonstrates the power of a refined color strategy.
“Don’t just think about what the worm looks like to you in the package. Think about what it looks like to a bass three feet deep in stained water with the sun overhead. That’s where the magic of color selection truly happens.”
Complete Guide to Plastic Worm Colors for Bass – Step-by-Step
Developing a systematic approach to plastic worm color selection removes guesswork and builds confidence. Follow this three-step process every time you’re on the water to consistently make the right choice. This is the core methodology behind any effective plastic worm color guide.
Step 1: Assess Water Clarity and Light Conditions
The first and most critical step is to evaluate the water. This determines how far light penetrates and how well bass can see detail versus just a silhouette.
- Action Item: Perform a visibility test. Lower your worm into the water and see at what depth you lose sight of it. This gives you a tangible measurement of clarity.
- Guidelines:
- Clear Water (Visibility > 4 feet): Use natural plastic worm colors. Translucent colors like Green Pumpkin, Watermelon Red, and Smoke are ideal clear water worm colors.
- Stained Water (Visibility 2-4 feet): This is the most versatile condition. Natural colors still work, but slightly darker or more vibrant variations like Green Pumpkin Magic or California Craw can excel.
- Murky Water (Visibility < 2 feet): Focus on contrast. The best murky water worm colors are dark solids (Black, Junebug, Black/Blue) and very bright, shocking colors (Chartreuse, White, Pink).
- Expected Outcome: You will have a primary color category (Natural, Dark, or Bright) to start with.
Step 2: Match the Primary Forage
Once you’ve selected a color category based on water clarity, refine your choice by imitating what the bass are eating. This is the essence of “matching the hatch.” Bass are opportunistic, but they often key in on the most abundant food source.
Observe the environment. Look for baitfish flickering on the surface, crawfish pinchers in a bass’s throat, or the types of panfish living in the shallows. In spring, bass are often focused on crawfish, making reds, oranges, and browns highly effective. In summer and fall, they may shift to shad or bluegill, making watermelon, pearl, and silver flake patterns the top producers.
Step 3: Consider the Season and Weather
Seasonal patterns and daily weather conditions add the final layer to your plastic worm color selection. Bass metabolism and behavior change throughout the year, influencing their color preferences.
During the spring pre-spawn, when bass are aggressive and feeding heavily on crawfish, vibrant reds and oranges often trigger more strikes. On bright, sunny days, colors with metal flake (gold, silver, red) can be incredibly effective as they reflect light and mimic the flash of baitfish scales. Conversely, on dark, overcast days, solid, non-flake colors often produce better as they create a more defined, easier-to-see silhouette against the gray sky.
Expert Tips & Best Practices for Plastic Worm Colors for Bass
Following a few fundamental rules and then building upon them with advanced techniques will accelerate your mastery of lure color. These worm color tips are designed for anglers at every level.
For Beginners: The Holy Trinity
- Start with Three Colors: Don’t overwhelm your tackle box. Start with Green Pumpkin, Black/Blue Flake, and Watermelon Red. These three colors will catch bass in virtually any lake, in any condition, anywhere in the country.
- Confidence is Key: Fish these core colors extensively to build confidence. Learn how they perform in different situations on your home waters before expanding your collection. Confidence in a lure makes you fish it more effectively.
- Keep a Log: Note which colors work best on which days, noting the water clarity, weather, and time of day. This data is invaluable for identifying patterns on your local fishery and is a cornerstone of effective worm color matching.
For Advanced Anglers: Subtle Refinements
- Master the Flake: Pay attention to the color and density of the glitter flake in your worms. In clear water on a sunny day, a worm with a fine silver or gold flake can be magical. In slightly stained water, a larger red or blue flake can provide the perfect amount of added attraction.
- Utilize Dyes and Markers: Carry lure dyes (like Spike-It) in Chartreuse, Red, and Blue. Dipping the tail of a green pumpkin worm in chartreuse can create a powerful attractant in stained water. Adding a touch of red to the head of a worm can imitate an injured baitfish or crawfish, triggering a predatory response.
3 Common Plastic Worm Colors for Bass Mistakes to Avoid
Even experienced anglers can fall into bad habits. Avoiding these common pitfalls in your plastic worm color selection process is crucial for consistent success.
Mistake #1: Ignoring Water Clarity
The Problem: An angler throws a subtle, translucent Watermelon Seed worm in muddy water with six inches of visibility. Bass can’t see it, and the angler gets no bites, blaming the spot or the lure style instead of the color.
The Solution: Always default to the rule of water clarity first. In that muddy water scenario, a switch to a solid black or Junebug worm would create a visible silhouette, dramatically increasing the odds of a strike. Make clarity assessment a non-negotiable first step.
Mistake #2: Marrying a Single “Confidence” Color
The Problem: An angler has had great success with Green Pumpkin in the past and now fishes it exclusively, regardless of changing conditions. They catch fish when the conditions are right for it, but struggle otherwise, stunting their growth as an angler.
The Solution: While confidence is good, adaptability is better. Force yourself to experiment. If you aren’t getting bites on your go-to color within 30 minutes, make a deliberate change based on the principles in this guide. The goal is to have multiple confidence colors for different scenarios.
Mistake #3: Thinking More Expensive Means Better
The Problem: Anglers often believe that a lure with a fancy, intricate, multi-colored pattern must be better than a simple, solid-colored one. They spend extra money on “custom” colors that may be designed more to catch anglers than fish.
The Solution: Remember that simplicity often wins. A basic black worm has probably caught more giant bass than any other color. Focus on the core principles of contrast and imitation, not on complex, flashy patterns that may offer no real advantage underwater.
Advanced Plastic Worm Colors for Bass Strategies for 2024/2025
As you become more proficient, you can start employing more nuanced, cutting-edge strategies to fool the most pressured bass. These techniques are what the pros use to gain an edge.
Leveraging Laminated and Core Shot Colors
Laminated worms feature two different colors fused together, typically a darker top and a lighter bottom. This perfectly mimics the natural countershading of most baitfish and prey, making it an incredibly realistic presentation. Core shot worms take this a step further, featuring an outer translucent color with a different, solid-colored core. As light passes through, it creates a unique, three-dimensional look that can be deadly in clear water. Experimenting with these advanced patterns, such as a Smoke/Purple Flake laminate or a Green Pumpkin worm with a chartreuse core, can show fish a look they haven’t seen before.
On-the-Water Color Customization
Don’t be afraid to modify your worms during your fishing day. Combining a green pumpkin Finesse worm with the tail of a chartreuse Trick worm (by melting them together carefully with a lighter) can create a unique hybrid lure. Similarly, using permanent markers to add gills, stripes, or dots can break up a worm’s profile and add a layer of realism. This level of customization allows you to adapt instantly to what the fish are telling you they want, creating the perfect lure for that specific moment.
Essential Tools & Resources for Plastic Worm Colors for Bass
Using the right gear and information sources can significantly improve your worm color matching and overall success.
Recommended Tools:
- High-Quality Polarized Sunglasses: This is the single most important tool. A good pair of polarized glasses in amber or copper cuts through surface glare, allowing you to accurately assess water clarity, spot submerged cover, and even see how your worm looks underwater.
- Lure Dye & Markers: A small kit with chartreuse, red/orange, and blue dyes or markers allows for instant, on-the-water customization. This is one of the best worm color tips for adapting quickly.
- A Waterproof Logbook or App: Diligently tracking what works and when is crucial. Note the date, location, water temperature, clarity, weather, and the specific plastic worm colors for bass that were most effective.
Additional Resources:
- Local Fishing Reports: Check online forums, tackle shop websites, and fishing apps for up-to-date information on what colors are producing on your target body of water.
- Underwater Lure Videos: Websites like YouTube have countless videos showing how different plastic worm colors appear at various depths and in different water clarities. This visual aid is incredibly helpful.
Frequently Asked Questions About Plastic Worm Colors for Bass
Q1: What are the absolute best plastic worm colors if I can only buy three?
Answer: The undisputed top three are Green Pumpkin, Black/Blue Flake, and Watermelon Red. Green Pumpkin is the most versatile natural color, mimicking everything from bluegill to crawfish and excelling in clear to stained water. Black/Blue Flake is the go-to for murky water worm colors and low-light conditions, providing maximum silhouette. Watermelon Red adds a subtle flash that is deadly in clear water, especially around vegetation.
Q2: How much should my seasonal worm colors change?
Answer: Seasonal changes are significant. In early spring (pre-spawn), bass are focused on crawfish, so colors with red, orange, and brown are key. In summer, their diet diversifies to include more baitfish and panfish, making natural plastic worm colors like watermelon and green pumpkin shine. In the fall, as bass chase schools of shad, pearl, smoke, and silver flake patterns become dominant. Winter calls for subtle, slow presentations, where dark, natural colors like black or junebug are often best.
Q3: Does the color of the glitter or flake in a worm really matter?
Answer: Absolutely. The flake is not just for show; it’s a critical part of the worm’s profile. On sunny days, metal flake (silver, gold) reflects light and mimics the flash of fish scales. On overcast days or in stained water, a colored flake (red, blue, purple) can add a subtle hue and attraction that makes a big difference. Effective worm color matching often comes down to choosing the right flake color for the conditions.
Q4: What is a simple rule for clear water worm colors versus murky water worm colors?
Answer: A simple and effective rule is: “Imitate in clear, contrast in dirty.” For clear water worm colors, your goal is realism, so choose natural, translucent colors that mimic local forage. For murky water worm colors, your goal is visibility, so choose colors that create a strong silhouette (dark solids like black) or a bright, visible target (Chartreuse, White).
Conclusion: Master Your Worm Colors and Master the Bass
The journey to understanding plastic worm colors for bass is one of the most rewarding endeavors in fishing. It elevates the sport from a game of chance to a calculated science, allowing you to adapt and overcome any challenge the water throws at you. By mastering the core principles of water clarity, forage imitation, and light conditions, you are no longer just casting randomly; you are presenting a carefully selected offering designed for maximum effect.
Embrace the process of experimentation and observation. Use this plastic worm color guide as your foundation, but let your on-the-water experiences build your expertise. The next time you’re faced with tough conditions, you’ll have the knowledge to open your tackle box, make a strategic color change, and feel the unmistakable thump of a bass on the end of your line. This mastery of plastic worm color selection is what will consistently put more fish in your boat.
Ready to Revolutionize Your Worm Fishing Game?
Use this guide to organize your tackle box today. Group your worms by category—Naturals, Darks, and Brights—so you can make quick, intelligent changes on the water. A well-organized system is the first step to fishing with more confidence and purpose.
Related Articles You Might Find Helpful:
- The Ultimate Worm Color Guide for Every Water Condition
- Texas Rig vs. Carolina Rig: When and Why
- Advanced Finesse Worm Techniques for Pressured Bass
What’s Your Experience with Plastic Worm Colors for Bass?
What is your absolute go-to, confidence-boosting plastic worm color that never seems to fail you? Share your favorite color and the conditions you use it in in the comments below! We’d love to hear your worm color tips.
Note: This guide is regularly updated to reflect the latest best practices and strategies in bass fishing. Last updated: October 17, 2023
Hi there, simply become aware of your blog via Google, and found that it is truly informative. I’m gonna be careful for brussels. I will appreciate if you happen to proceed this in future. Many folks might be benefited from your writing. Cheers!
Thanks for stopping by! I’m glad you found the blog through Google.
I’m curious – which fishing lure post did you find most helpful? Are you interested in freshwater or saltwater lures? Always happy to cover specific topics if you have questions about lure selection, techniques, or anything fishing-related!