Mastering Chatterbait Trailers: The Ultimate Guide
Ever thrown a bladed jig all day only to come up empty-handed, wondering what you’re doing wrong? The secret to unlocking the full, explosive potential of this lure often lies in a small, overlooked detail: the soft plastic you put on the back. Choosing the right chatterbait trailers can transform a good day on the water into an unforgettable one. This guide is designed to eliminate the guesswork, providing a comprehensive roadmap to help you select, rig, and fish these critical components like a seasoned pro.
Too many anglers grab any old plastic from their bag, unknowingly sabotaging their lure’s action and appeal. But the art and science behind chatterbait trailers is what separates the casual fisherman from the tournament winner. We will dive deep into every aspect, from understanding different trailer profiles and actions to mastering advanced color combinations and rigging techniques. Get ready to turn that subtle thump into a rod-jarring strike.
Table of Contents
- What Are Chatterbait Trailers?
- Key Benefits and Importance
- A Complete Guide to Chatterbait Trailer Selection
- Expert Tips & Best Practices
- Common Mistakes to Avoid
- Advanced Strategies for 2024/2025
- Essential Tools & Resources
- Frequently Asked Questions
What Are Chatterbait Trailers?
Chatterbait trailers are soft plastic baits that are threaded onto the hook of a bladed jig to enhance its profile, action, color, and overall effectiveness. They are not just an accessory; they are a fundamental component that directly influences the lure’s vibration, sink rate, and ability to attract fish. Without the right trailer, a bladed jig is only performing at a fraction of its potential.
A deep understanding of the available chatterbait trailer options is crucial for success. Your chatterbait trailer selection process should be deliberate, considering water conditions and the target forage. This comprehensive chatterbait trailer guide will explore the best chatterbait trailers on the market, various chatterbait trailer colors and chatterbait trailer sizes, and effective chatterbait trailer techniques. By mastering different chatterbait trailer combinations, you can create a presentation that bass simply cannot resist, making your chatterbait trailer fishing far more productive.
Key Components
- Body Profile: The shape of the trailer (e.g., swimbait, craw, fluke) determines the lure’s overall size and how it moves through the water, impacting its realism.
- Tail Action: The tail is the engine of the trailer. A kicking boot tail adds its own thump, while a subtle split tail glides more naturally.
- Material & Buoyancy: The plastic’s composition affects its durability and buoyancy. Some materials, like ElaZtech, float, which can help the lure ride higher in the water column.
- Scent & Flavor: Many modern trailers are impregnated with salt and scent attractants, which can encourage fish to hold on longer after the strike.
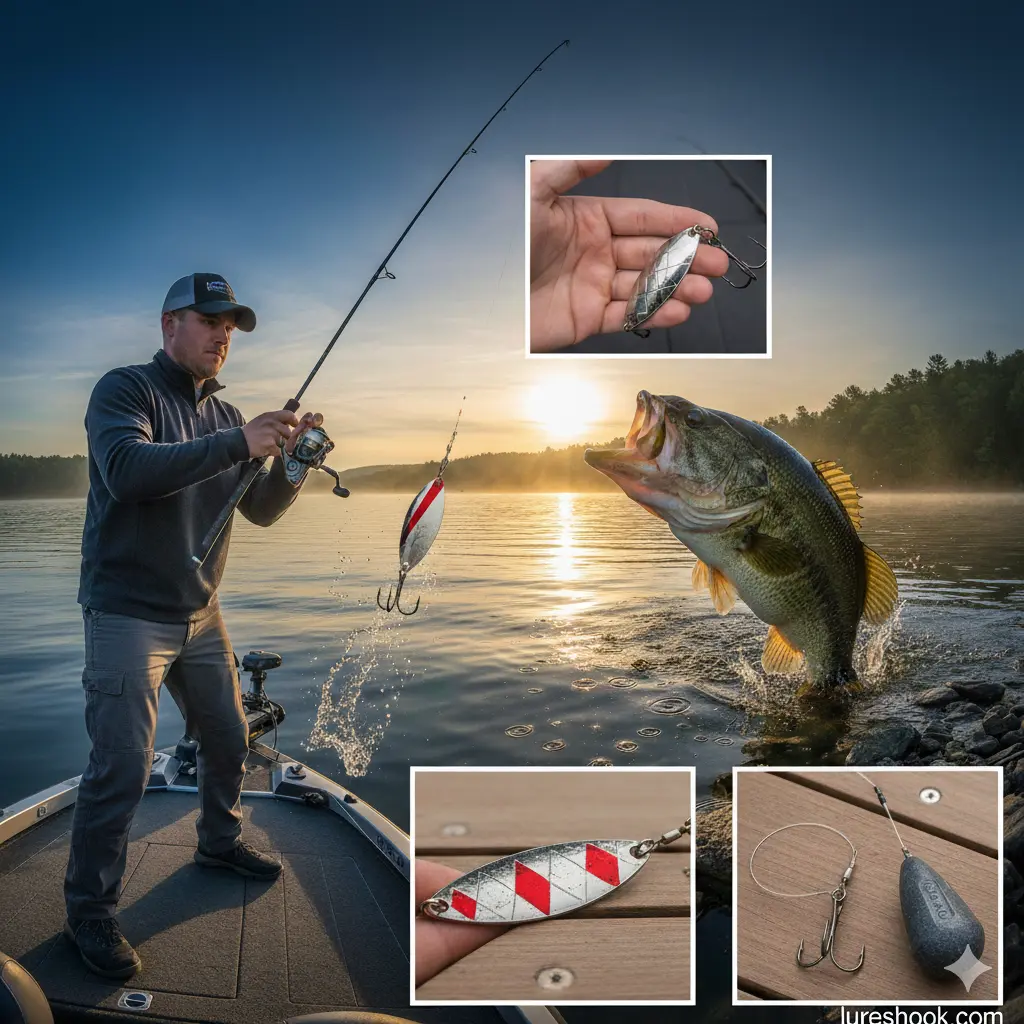
Why Chatterbait Trailers Matter: Key Benefits
Properly chosen chatterbait trailers can increase your catch rate significantly. They complete the lure’s presentation by adding lifelike action and a more substantial profile, which triggers a predatory response from bass. In essence, the trailer is what turns the metal and plastic of a bladed jig into a believable meal.
Enhanced Realism and Profile
A bladed jig by itself is an abstract lure. A trailer gives it a recognizable silhouette that bass are programmed to eat, such as a bluegill, shad, or crawfish. By adding a swimbait-style trailer, you create a swimming baitfish profile. Conversely, adding a craw-style trailer and fishing the lure near the bottom perfectly mimics a fleeing crustacean. This ability to accurately “match the hatch” is a primary benefit of using different chatterbait trailers.
Optimized Action and Vibration
The trailer doesn’t just add looks; it fundamentally alters the lure’s action. A bulky trailer can dampen the blade’s vibration for a more subtle presentation in cold or clear water. A trailer with a hard-kicking tail can add a secondary vibration and a more erratic “hunting” action to the lure, which is incredibly effective in stained water or for triggering reaction strikes. Mastering these nuances is a key part of successful chatterbait trailer fishing.
“The trailer is 50% of the equation. It controls the lure’s depth, action, and profile. If you’re not changing your trailer to match the conditions, you’re leaving fish on the table.”
A Complete Guide to Chatterbait Trailer Selection
The process of selecting the perfect chatterbait trailer can be broken down into a simple, repeatable methodology. Following these steps will ensure you always have the right tool for the job, tailored to the specific environment you’re fishing.
Step 1: Analyze Water Conditions and Forage
Before you even open your tackle box, assess your surroundings. This initial analysis is the foundation of your chatterbait trailer selection strategy.
- Water Clarity: In clear water, opt for natural colors (Green Pumpkin, Watermelon Red) and more subtle trailer actions. In stained or muddy water, use brighter colors (Chartreuse, White) or dark, contrasting colors (Black and Blue) with aggressive, thumping tails to help fish find the lure.
- Primary Forage: What are the bass eating? If they’re chasing shad, a fluke or swimbait-style trailer is ideal. If they’re feeding on bluegill, a trailer with a taller, flatter profile is better. If crawfish are on the menu, a creature or craw-style trailer is the obvious choice.
- Cover Type: When fishing through dense grass, a streamlined trailer like a fluke or split-tail minnow comes through more cleanly. In open water or around sparse cover, a bulkier trailer with more action can be used effectively.
Step 2: Choose the Trailer Profile and Action
With your analysis complete, you can now choose a specific trailer type. The three primary categories of chatterbait trailers offer distinct advantages.
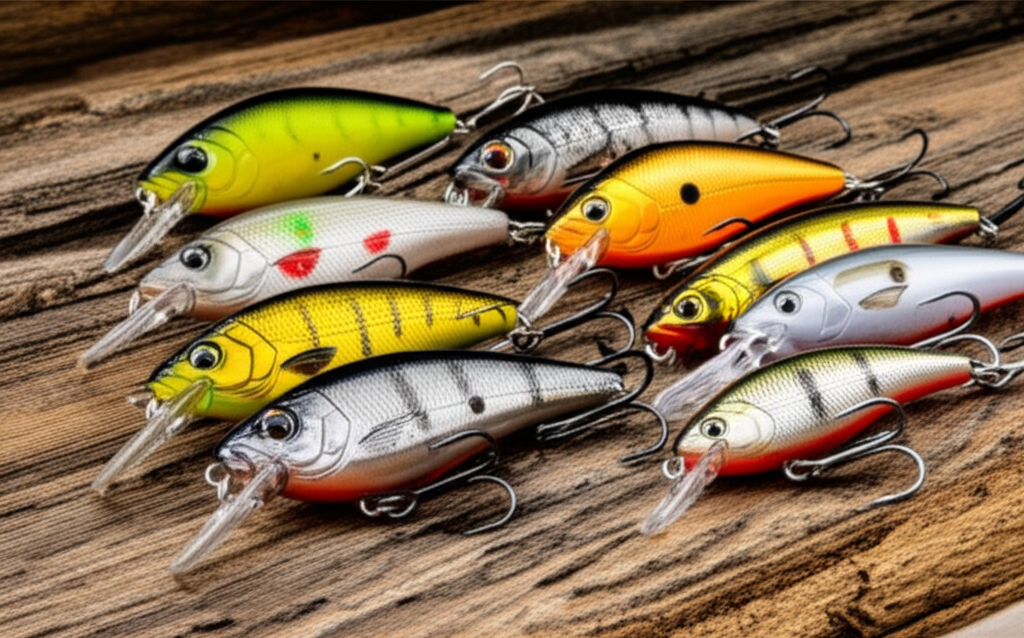
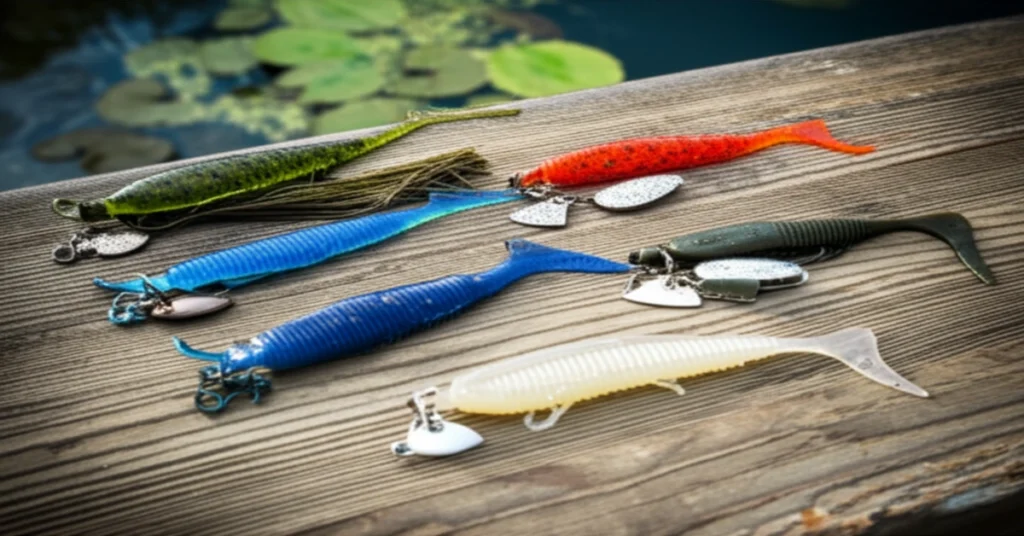
Swimbait Trailers (e.g., Z-Man RaZor ShadZ, Keitech Swing Impact FAT): These are the most common and versatile choice. The boot tail adds a secondary kicking action and helps the lure run true. They excel at mimicking baitfish and are effective in nearly all conditions.
Craw & Creature Trailers (e.g., Strike King Rage Craw, Z-Man Turbo CrawZ): These trailers feature flapping appendages that provide a unique action. They are excellent for mimicking crawfish and work best when the lure is fished slowly along the bottom or yo-yo’d through cover. Be mindful that some aggressive craws can sometimes overpower the blade’s action.
Split-Tail & Fluke Trailers (e.g., Zoom Super Fluke, Yamamoto Zako): These offer the most subtle action. They don’t add much kick, allowing the blade to provide 100% of the vibration. This makes them perfect for cold water, highly pressured fish, or when you need a lure with a very tight, fast shimmy to mimic fleeing shad.
Step 3: Dial in Chatterbait Trailer Sizes and Colors
The final step is to refine your choice with the correct size and color. This is where you can fine-tune your presentation to perfection.
When it comes to chatterbait trailer sizes, the goal is balance. A trailer that is too large can kill the lure’s action, while one that’s too small won’t provide an adequate profile. A good rule of thumb is to match the trailer length to the skirt length, typically in the 3.5 to 4.5-inch range for standard 1/2 oz bladed jigs. For chatterbait trailer colors, start with the basics: match your trailer color to the jig’s skirt color for a natural look (e.g., green pumpkin skirt with a green pumpkin trailer). For more aggressive presentations or in dirty water, use a contrasting color (e.g., green pumpkin skirt with a white trailer) to create a more visible target.
Expert Tips & Best Practices for Chatterbait Trailers
Moving beyond basic selection requires adopting expert-level habits. These proven chatterbait trailer tips will help you get more from your bladed jigs and adapt to changing conditions on the fly.
For Beginners:
- Secure It with Glue: Place a small drop of super glue on the hook shank and bait keeper before sliding your plastic up. This will keep your trailer perfectly positioned and prevent it from sliding down after a fish strike or contact with cover, saving you time and frustration.
- Start with a Swimbait: If you’re new to using chatterbait trailers, a 4-inch swimbait in a shad or green pumpkin color is the most versatile starting point. It works in the widest range of conditions and is easy to rig correctly.
- Check Your Action: After rigging a new trailer, always make a short cast next to the boat to see how it affects the lure’s action. Ensure the blade is vibrating correctly and the lure is running straight without rolling over.
For Advanced Users:
- Custom Trimming: Don’t be afraid to modify your trailers. Trimming the head of a swimbait can create a more seamless transition to the jig head. Shortening the overall length can create a more compact profile, which is great for finicky fish or when targeting smaller species.
- Layering Scents: Even if your trailer comes scented, adding a gel-based scent can be a difference-maker, especially in slower presentations. Apply scent to the tail and body to leave a scent trail in the water, appealing to a fish’s sense of smell as well as sight and vibration. This is a top-tier tactic in advanced chatterbait trailer techniques.
5 Common Chatterbait Trailers Mistakes to Avoid
Success is often about avoiding critical errors. Many anglers make these simple mistakes with their chatterbait trailers, which significantly hampers their lure’s effectiveness and costs them bites.
Mistake #1: Using a Trailer That’s Too Large
The Problem: A big, bulky trailer can act like a rudder, overpowering the blade’s vibration. This kills the signature “chatter” and can cause the lure to roll on its side during the retrieve.
The Solution: Choose a trailer with a streamlined profile that is proportional to the jig. If you need a larger profile, use a longer, thinner trailer rather than a short, fat one. Always test the action boat-side.
Mistake #2: Rigging the Trailer Crooked
The Problem: If the soft plastic is not threaded perfectly straight on the hook shank, the entire lure will be off-balance. It will not run true, often spiraling or veering off to one side, looking completely unnatural.
The Solution: Take your time when rigging. Insert the hook point directly in the center of the trailer’s nose and guide it straight through the body, ensuring it exits cleanly in the center of the back.
Mistake #3: Mismatching Trailer Action to Conditions
The Problem: Using a trailer with a hard, thumping tail in ultra-clear, cold water can be too aggressive and spook wary fish. Conversely, using a subtle fluke-style trailer in muddy water may not create enough disturbance for fish to locate it.
The Solution: This is a core concept in our chatterbait trailer guide. Use high-action trailers in stained water and for reaction bites. Use low-action trailers in clear water and for finesse presentations.
Mistake #4: Sticking to Only One Trailer Type
The Problem: Fish can become conditioned to seeing the same lure profiles. Using the same swimbait trailer all day, every day, limits your ability to adapt when the bite gets tough.
The Solution: Carry a variety of chatterbait trailer options. If the swimbait isn’t working, switch to a craw or a fluke. This simple change in profile and action can be all it takes to trigger a bite.
Mistake #5: Ignoring the Bait Keeper
The Problem: Simply pushing the plastic over the bait keeper without ensuring it’s properly seated. This leads to the trailer constantly sliding down the hook, ruining the action and forcing you to fix it after every cast.
The Solution: Make sure the plastic is pushed fully over the keeper and sits snugly against the jig head. For extra security, use the super glue trick mentioned in our best practices section.
Advanced Chatterbait Trailers Strategies for 2024/2025
To stay ahead of the curve, top anglers are constantly innovating. These cutting-edge approaches to using chatterbait trailers can give you a distinct advantage on highly pressured waters.
The “Action-Dampening” Technique
In post-frontal conditions or on glass-calm days, bass can be notoriously shy of aggressive vibrations. The advanced strategy here is to intentionally dampen the chatterbait’s action. Use a slightly oversized, straight-tailed trailer like a Yamamoto Senko (with an inch or two bitten off). This bulkier, actionless body forces the blade to produce a much tighter, more subtle vibration. It turns the lure from a roaring muscle car into a silent electric vehicle, appealing to neutral or negative fish.
Vertical Jigging with a Bladed Jig
Most anglers fish a bladed jig horizontally, but it can be a deadly vertical presentation for suspended fish located on electronics. For this, one of the best chatterbait trailers is a fluke-style minnow. Drop the lure straight down to the fish and use short, sharp pops of the rod tip. The blade will flash and vibrate on the up-tick, and the fluke trailer will glide and shimmy enticingly on the fall, a combination that suspended fish rarely see and can’t resist.
Essential Tools & Resources for Chatterbait Trailers
Having the right gear and knowledge sources makes executing these strategies much easier. Here are some must-have tools and resources for anyone serious about mastering chatterbait trailers.
Recommended Tools:
- Z-Man RaZor ShadZ: Made from durable ElaZtech material, this segmented swimbait has a fantastic action and stays on the bait keeper better than almost any other plastic. It’s a workhorse trailer.
- Yamamoto Zako: Designed specifically by pro angler Brett Hite as a chatterbait trailer, its deep belly and tight tail action perfectly complement a bladed jig’s vibration without overpowering it.
- Pro’s Soft-Bait Glue: A dedicated lure glue is a game-changer. It provides a stronger, more flexible bond than standard super glue and can also be used to repair torn soft plastics, extending their life.
Additional Resources:
- Pro Angler YouTube Channels: Follow channels from professional anglers who specialize in bladed jigs. They often provide invaluable, up-to-the-minute chatterbait trailer tips and show how they make adjustments in real-time during tournaments.
- Online Fishing Forums: Websites like BassResource provide communities where anglers share their successes and failures. Searching for threads on chatterbait trailer combinations can reveal regional patterns and niche techniques.
Frequently Asked Questions About Chatterbait Trailers
Q1: What are the most important factors for proper chatterbait trailer selection?
Answer: The three most critical factors in chatterbait trailer selection are matching the local forage, adapting to the water clarity, and choosing an action that fits the fish’s mood. A successful choice often involves balancing these factors. For example, even if shad are the main forage (suggesting a swimbait), if the water is cold and the fish are lethargic, a more subtle fluke-style trailer might be the better choice. Always start by observing your environment before looking at your chatterbait trailer options.
Q2: Can you use a chatterbait without a trailer?
Answer: Yes, you can, but it is rarely the best option. Without a trailer, the lure has a very small profile and can have an overly erratic, wild action. Adding a trailer provides bulk, balances the lure, and gives the fish a better target to strike, dramatically increasing your hook-up ratio. A trailerless presentation is a niche tactic, not a standard practice.
Q3: How does the trailer affect the lure’s retrieve speed?
Answer: A bulky trailer with a lot of drag, like a large creature bait, will create more lift and allow you to retrieve the lure more slowly while keeping it in the strike zone. A streamlined trailer, like a fluke, has less drag and allows the lure to be burned quickly just under the surface. Adjusting your chatterbait trailer sizes and shapes is an effective way to control your retrieve speed and depth.
Q4: What is the best all-around chatterbait trailer for a beginner?
Answer: For someone just starting with chatterbait trailer fishing, the undisputed champion is a 4-inch boot-tail swimbait. It’s versatile, effective, and easy to rig. A color like Green Pumpkin for general use or Pearl White for mimicking shad will cover a vast majority of situations and help you build confidence in the technique.
Conclusion: Master Chatterbait Trailers for Long-term Success
The journey to mastering bladed jigs begins and ends with a deep appreciation for chatterbait trailers. They are not an afterthought but a strategic choice that dictates the lure’s action, profile, and effectiveness. By understanding how to select the right trailer for the conditions, you elevate your fishing from a game of chance to a calculated science.
As you move forward, continue to experiment with different chatterbait trailer combinations and pay close attention to the subtle feedback the lure gives you. The future of effective chatterbait trailer fishing lies in this adaptability. By applying the principles in this chatterbait trailer guide, you are now equipped with the knowledge to consistently catch more and bigger fish, turning your bladed jig into the true powerhouse it was meant to be.
Related Articles You Might Find Helpful:
- The Ultimate Guide to Chatterbait Trailer Colors for Every Water Condition
- How to Choose the Right Bladed Jig for Any Situation
- Advanced Chatterbait Trailer Techniques the Pros Don’t Want You to Know
What’s Your Go-To Chatterbait Trailers Experience?
What is your absolute confidence combination of a chatterbait and trailer? Share your favorite brand, model, and color in the comments below—let’s learn from each other!
Note: This guide reflects current best practices and is updated regularly to ensure accuracy. Last updated: 2024-10-27